Configuring Extraction for Amazon S3
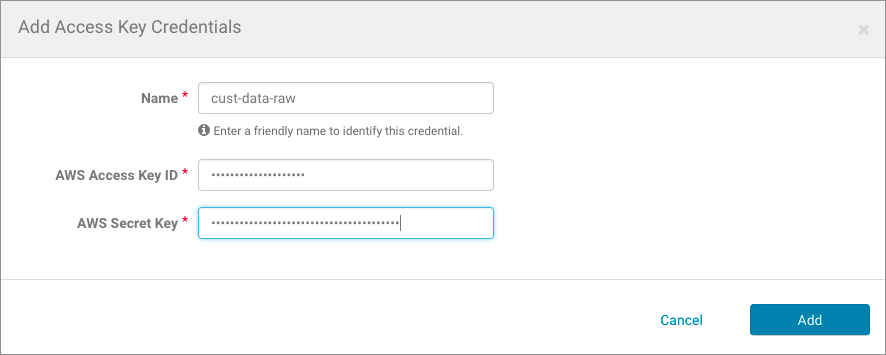
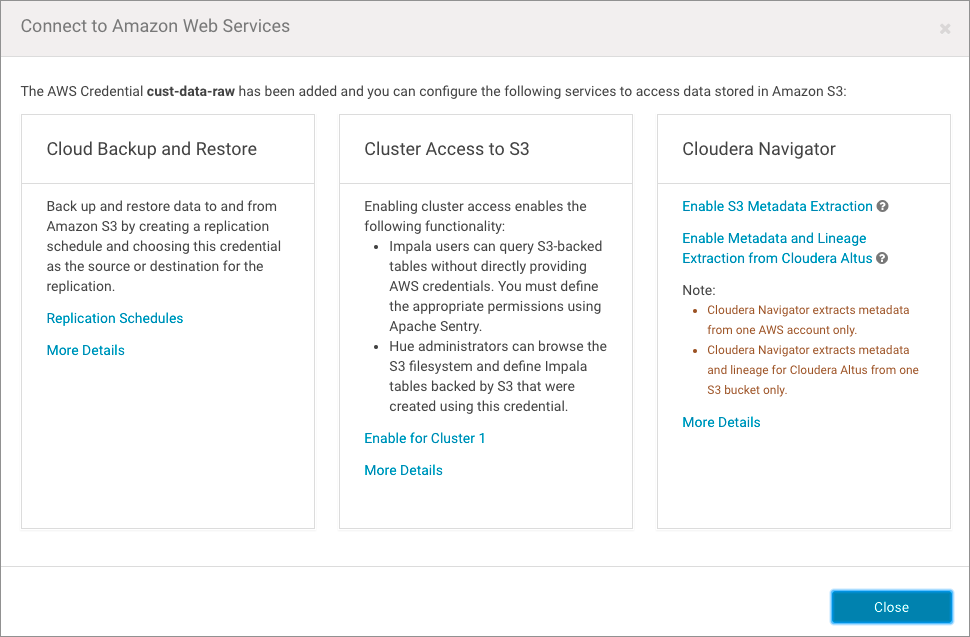
- Default configuration—The default configuration is available for Amazon S3 buckets that have no existing Amazon SQS or Amazon SNS services configured. During configuration, Cloudera Navigator accesses the configured AWS account, performs an initial bulk extract from the Amazon S3 bucket, sets up Amazon SQS queues in each region with buckets, and sets up event notifications for each bucket for subsequent incremental extracts—all transparently to the Cloudera Manager administrator handling the configuration process.
- Custom configuration—Custom configuration is required for any Amazon S3 bucket that is currently using Amazon SQS (has queues set up for other applications, for example) or is setup for notifications using Amazons SNS. In these cases you must manually configure a new queue—bring your own queue—and in some cases, additionally configure Amazon SNS for fanout.
AWS Credentials Requirements
- Cloudera Navigator can have only one active connection configured for an AWS Credential at any time. Once you configure an AWS Credential and enable S3 metadata extraction for that credential, it cannot be used for another Amazon S3 bucket.
- An AWS Credential configured for connectivity from one Cloudera Navigator instance cannot be used by another Cloudera Navigator instance. Configuring the same AWS Credentials for use with different Cloudera Navigator instances can result in unpredictable behavior.
- Cloudera Navigator requires an AWS Credential associated with an IAM user identity rather than an IAM role.
- For the default configuration, the account for this AWS Credential must have administrator privileges for:
- For the custom configurations, the account needs privileges for Amazon S3, Amazon SQS, and for Amazon Simple Notification Service (SNS).
Default Configuration
The steps below assume that you have the required AWS Credentials for the IAM user with the Amazon S3 bucket. Amazon Web Services (AWS) account (an IAM user account) and that you can use the AWS Management Console . The AWS Credentials for the IAM user are configured for Cloudera Navigator using the Cloudera Manager Admin Console during the configuration process below.
 Important: If the Amazon S3 bucket is already configured for queuing or notification,
do not follow the steps in this section. See Custom Configurations instead.
Important: If the Amazon S3 bucket is already configured for queuing or notification,
do not follow the steps in this section. See Custom Configurations instead.Custom Configurations
Follow these steps for Amazon S3 buckets that are already configured with queues or event notifications. Custom configurations include coinfiguring your own queue (BYOQ) and BYOQ with Fan-out, as detailed below.
Configuring Your Own Queues
- Creating and configuring an Amazon Simple Queue Service (SQS) queue for Cloudera Navigator for each region in which the AWS (IAM user) account has Amazon S3 buckets.
- Configuring Amazon Simple Notification Service (SNS) on each bucket to send Create, Rename, Update, Delete (CRUD) events to the Cloudera Navigator queue.
- Configuring the bucket for Notification Fan-Out if needed to support existing notifications configured for other applications.
- Adding a Policy for the appropriate extraction process (Bulk + Incremental, Bulk Only) to the IAM user account.
- Adding the Policy for event notifications to the IAM user account.
 Important: Always make sure any newly created Amazon S3 buckets are configured for
event notifications before adding data so the queues are properly updated.
Important: Always make sure any newly created Amazon S3 buckets are configured for
event notifications before adding data so the queues are properly updated.Configure the Queue for Cloudera Navigator
This manual configuration process requires stopping Cloudera Navigator. You must create a queue for each region that has S3 buckets.
- Log in to Cloudera Manager Admin Console and stop Cloudera Navigator:
- Select
- Click the Instances tab.
- Click the checkbox next to Navigator Audit Server and Navigator Metadata Server in the Role Type list to select these roles.
- From the Actions for Selected (2) menu button, select Stop
- Log in to the AWS Management Console with AWS account (IAM user) and open the Simple Queue Service setup page (select . Click Create New Queue or Get Started Now if region has no configured queues.)
- For each region that has Amazon S3 buckets, create a queue as follows:
- Click the Create New Queue button. Enter a Queue Name, click the Standard Queue (not FIFO), and then click Configure
Queue. Configure the queue using the following settings:
Default Visibility Timeout 10 minutes Message Retention Period 14 days Delivery Delay 0 seconds Receive Message Wait Time 0 seconds - Select the queue you created, click the Permissions tab, click Add a Permission, and configure the following in the
Add a Permision to... dialog box:
Effect Allow Principal Everybody Actions SendMessage - Click the Add Conditions (optional) link open the condition fields and enter the following values:
Qualifier None Condition ArnLike Key aws:SourceArn Value arn:aws:s3::*:* - Click Add Condition to save the settings.
- Click Add Permission to save all settings for the queue.
- Click the Create New Queue button. Enter a Queue Name, click the Standard Queue (not FIFO), and then click Configure
Queue. Configure the queue using the following settings:

Repeat this process for each region that has Amazon S3 buckets.
Configure Event Notification for the Queues
- Navigate to the Amazon S3 bucket for the region ().
- Select the bucket.
- Click the Properties tab.
- Click the Events settings box.
- Click Add notification.
- Configure event notification for the bucket as follows:
Name nav-send-metadata-on-change Events - ObjectCreated(All)
- ObjectRemoved(All)
Send to SQS Queue SQS queue Enter the name of your queue
 Important: Cloudera Navigator extracts metadata from one queue only for each
region.
Important: Cloudera Navigator extracts metadata from one queue only for each
region.Configuring Amazon SNS Fan-out
Configure SNS fanout if you have existing S3 event notification. For more information about SNS fanout, see Amazon documentation for Common SNS Scenarios
- Add the following to the Navigator Metadata Server Advanced Configuration Snippet (Safety Valve) for cloudera-navigator.properties. See Setting Properties with Advanced Configuration Snippets for details about using Cloudera Manager Admin Console if necessary.
nav.s3.extractor.incremental.enable=true
nav.s3.extractor.incremental.auto_setup.enable=false
nav.s3.extractor.incremental.queues=queue_json
Specify the queue properties using the following JSON template (without any spaces). Escape commas (,) by preceding them with two backslashes (\\), as shown in the template:[{"region":"us-west-1"\\,"queueUrl":"https://sqs.aws_region.amazonaws.com/account_num/queue_name"}\\,{queue_2}\\, ... {queue_n}] - Restart Cloudera Navigator.
Defining and Attaching Policies
Event Notification Policy for Custom Queues
{
    "Version": "2012-10-17",
    "Statement": [
        {
            "Sid": "Stmt1481678612000",
            "Effect": "Allow",
            "Action": [
                "sqs:DeleteMessage",
                "sqs:DeleteMessageBatch",
                "sqs:GetQueueAttributes",
                "sqs:ReceiveMessage"
            ],
            "Resource": "*"
        },
        {
            "Sid": "Stmt1481678744000",
            "Effect": "Allow",
            "Action": [
                "s3:GetBucketLocation",
                "s3:ListAllMyBuckets",
                "s3:ListBucket",
                "s3:GetObject",
                "s3:GetObjectAcl",
                "s3:GetBucketNotification",
                "s3:PutBucketNotification"
            ],
            "Resource": [
                "arn:aws:s3:::*"
            ]
        }
    ]
}
Extraction Policies for Custom Queues
Custom configurations require a valid extraction policy be defined and attached to the AWS user account associated with the Amazon S3 bucket. The policy is a JSON document that specifies the type of extraction. As mentioned in Overview of Amazon S3 Extraction Processes, the two types of extraction are as follows:
- Bulk + Incremental—This is the recommended approach for both cost and performance reasons and is used by the Default Configuration process automatically.
- Bulk Only—This approach is recommended for proof-of-concept deployments. It is required for the BYOQ with Fan-out configuration. In addition to applying the policy as detailed below, this approach also requires setting the nav.s3.extractor.incremental.enable property to false. See Setting Properties with Advanced Configuration Snippets and the Cloudera Navigator Properties for Amazon S3 for details.
- Log in to the AWS Management Console using the IAM user account associated with the target Amazon S3 bucket.
- Copy the appropriate JSON text from the table below Extraction Policies JSON Referenceand paste into the AWS Management Console policy editor for the Navigator user account on (the IAM user) through the AWS Management Console.
Extraction Policies JSON Reference
| Bulk + Incremental (Recommended) | Bulk Only |
|---|---|
|
|
{
    "Version": "2012-10-17",
    "Statement": [
        {
            "Sid": "Stmt1481678612000",
            "Effect": "Allow",
            "Action": [
                "sqs:CreateQueue",
                "sqs:DeleteMessage",
                "sqs:DeleteMessageBatch",
                "sqs:GetQueueAttributes",
                "sqs:GetQueueUrl",
                "sqs:ReceiveMessage",
                "sqs:SetQueueAttributes"
            ],
            "Resource": "*"
        },
        {
            "Sid": "Stmt1481678744000",
            "Effect": "Allow",
            "Action": [
                "s3:GetBucketLocation",
                "s3:ListAllMyBuckets",
                "s3:ListBucket",
                "s3:GetObject",
                "s3:GetObjectAcl",
                "s3:GetBucketNotification",
                "s3:PutBucketNotification"
            ],
            "Resource": [
                "arn:aws:s3:::*"
            ]
        }
    ]
} |
{
    "Version": "2012-10-17",
    "Statement": [
        {
            "Sid": "Stmt1481676614000",
            "Effect": "Allow",
            "Action": [
                "s3:GetBucketLocation",
                "s3:ListAllMyBuckets",
                "s3:ListBucket",
                "s3:GetObject",
                "s3:GetObjectAcl"
            ],
            "Resource": [
                "arn:aws:s3:::*"
            ]
        }
    ]
} |
Setting Properties with Advanced Configuration Snippets
Certain features require additional settings or changes to the Cloudera Navigator configuration. For example, configuring BYOQ queues to use bulk-only extraction requires not only creating and attaching the extraction policy but also adding the following snippet to the Navigator Metadata Server Advanced Configuration Snippet (Safety Valve) for cloudera-navigator.properties setting:
nav.s3.extractor.incremental.enable=false
To change property values by adding an advanced configuration snippet:
- Log in to the Cloudera Manager Admin Console.
- Select .
- Click Configuration.
- Click Navigator Metadata Server under the Scope filter, and click Advanced under the Category filter.
- Enter Navigator Metadata Server Advanced Configuration Snippet (Safety Valve) for cloudera-navigator.properties in the Search field to find the property.
- Enter the property and its setting as a key-value pair, for example:
property=your_setting
in: - Click Save Changes.
- Restart the Navigator Metadata Server instance.
| << Using Cloudera Navigator with Amazon S3 | ©2016 Cloudera, Inc. All rights reserved | Cloudera Navigator APIs >> |
| Terms and Conditions Privacy Policy |

 Note:
Note: